IntroductionDocumentation Conventions |
Last updated 09/18/2010 |
The following are the conventions used in this documentation:
Cross-Platform References
Modifier Keys
Wherever possible, the documentation will use "multiple platform" references in relation to the user of modifier keys in order to make sure there is no confusion. For example, on Mac OS X the modifier keys are Control (abbreviated as "Ctrl"), Option, and Command (abbreviated "Cmd"). On Windows the modifier keys are Control (abbreviated as "Ctrl"), Alt, and the Windows key. In order to be clear, both references will be used when necessary.
For example, if the documentation is to tell you to execute the modifier key command to copy the selected item to the clipboard, you might be instructed to:
"Select the figure to copy, then type Cmd-C (Mac) or Ctrl-C (Win)."
Contextual Menus
These drop down menus are usually executed by holding down the right mouse button and clicking (also called "right-clicking"), and present a list of context-specific options on the thing you clicked. Mice for Windows computers have had the ability to "right-click" for a long time, but it was only in the last few years that Macs have had mice that had a right mouse button to use - prior to that, users had to hold down the Control key and click to drop down these menus. Today, all Mac users, even those with two button mice, can still Control-click to get the contextual menus.
However, for the purposes of the documentation the term "right-click" will be used to indicate this action. So for example, you might be told:
"To add a selected figure to the Library, right-click on the figure and choose Add to Library... from the drop down menu."
Use of Screenshots
Since Stykz was designed to work on multiple operating systems, the appearance of things in Stykz will be nearly identical on all platforms, and so for consistency the screenshots used in this documentation will all be from one platform (in this case, Mac OS X) unless there is something specific that another platform that needs to be pointed out.
Menu References
When referring to menu item selections, this convention will be used:
menuName > menuItem
This will mean the equivalent of "select menuItem from the menuName menu". So for example, if you are told to "Select Figure > Add to Library... " then it means to select the menu item Add to Library... from the Figure menu. If there is a submenu to select from (and at the moment of this writing, the only submenu in Stykz is File > Open Recent on Mac OS X), the convention will be extended to:
menuName > subMenuName > subMenuItem
An example of this would be File > Open Recent > Test.stykz, which would mean to select Test.stykz from the Open Recent submenu of the File menu.
Menu Items In Different Platform-Specific Locations
If a few instances, there are some menu items that appear in a different menu on Macs than on Windows (or Linux). For example, the "Preferences..." menu item appears under the Stykz menu (generically called the "Application Menu") on Macs, but under the Edit menu on Windows/Linux. In order to prevent a lot of extra terminology/explanations, the locations in WIndows/Linux will be used in all examples in this document, but the menu name will have an asterisk (*) added to indicate that it is different on Macs; you can then refer to this page to get its actual location.
The different menu item locations are as follows:
| Item | Windows/Linux | Mac OS X |
| Preferences... | Edit > Preferences... | Application Menu > Preferences... |
| About Stykz... | Help > About Stykz... | Application Menu > About Stykz... |
| Recently opened documents | At the bottom of the File menu | Under File > Open Recent submenu |
Dialog Box Navigation
Similar to referring to a menu item selection, the right angle bracket ( > ) will be used also to indicate different tabs, areas, or groups in a dialog box or window.

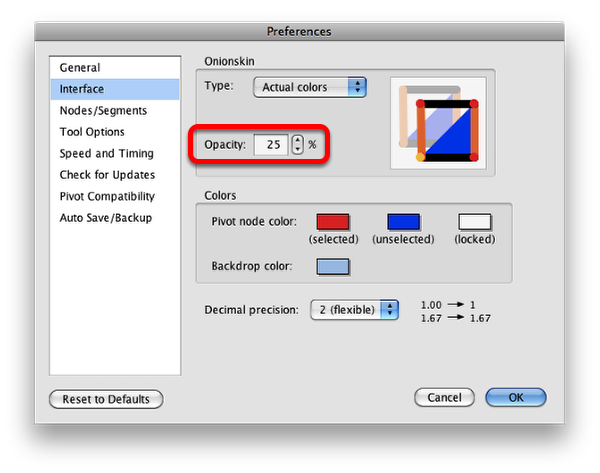
So for example, to refer to changing the outlined item in the picture above, you would be instructed:
"Select Edit* > Preferences... to open the Preferences dialog, and then change the value of Interface > Onionskin > Opacity to '50%'."
This would indicate selecting Interface from the list of areas on the left side of the dialog, going to the Onionskin group box and manipulating the value for Opacity contained within.
Sometimes this is merged together with a double right angle bracket (>>) to indicate a shift from menu item selection to dialog box navigation, as in:
"Onionskin opacity can be changed in Preferences (Edit* > Preferences... >> Interface > Onionskin > Opacity)."