Miscellaneous FeaturesAdjusting Figure/Segment Layering |
Last updated on 11/20/2010 |
Figure Layering
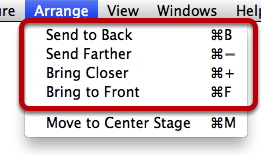
Every figure on the Stage sits in its own layer, and the way figures layer in front of or in back of each other can be adjusted by using the Arrange menu:

To move the selected figure(s) in front of all the other figures on the Stage, choose Arrange > Bring to Front. To move them behind everything else, choose Arrange > Send to Back. If you only want to move the selected figure(s) one layer at a time, you can use Arrange > Bring Closer to bring it closer to the front by one layer, or Arrange > Send Farther to send it towards the back by one layer.
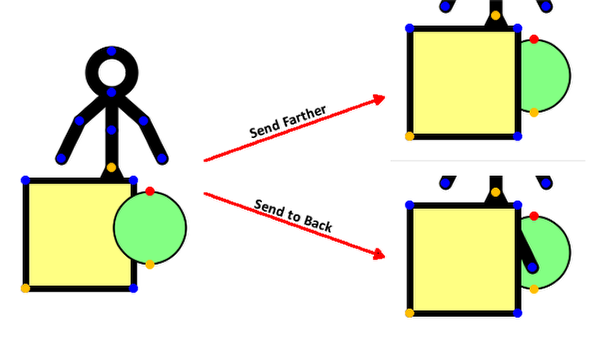
The example below shows Send Farther and Send to Back, but you can imagine the opposite effect for Bring Closer and Bring to Front:

Segment Layering
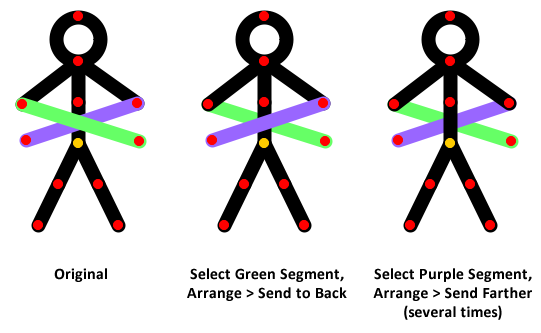
You can adjust one or more selected segments in much the same way, except you'll need to use the Subselect tool to select one or more segments, and then choose from one of the Arrange options. here's an example of how this works:

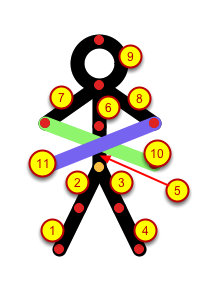
Note that in the case of Send Farther or Bring Closer, you may need to execute it several times before you get the effect you want. This is because each segment is on its own layer inside the figure, and as you execute each Send Farther/Bring Closer, you are adjusting the selected segment(s) by one layer at a time. Here's a closeup of the original figure and the segment layering order indicated by the numbers in the circles (the lower numbers are in the back and the higher numbers are in the front):

So you can see that wanting to move the purple line (layer #11) behind the "waist" segment of the figure (layer #5) would require six calls to Arrange > Send Backwards. The alternative, of course, would be to select segment #5 and execute Arrange > Bring to Front.