The PalettesLibrary Palette |
Last updated on 10/31/2010 |
The Library Palette is used in Stykz to store a set of figures (.styk files) that you would like to use in your animations.
To toggle the display of the Library Palette, choose Windows > Library, or type Cmd-1 (Mac) or Ctrl-1 (Win).
The basic functionality of the palette is as follows:
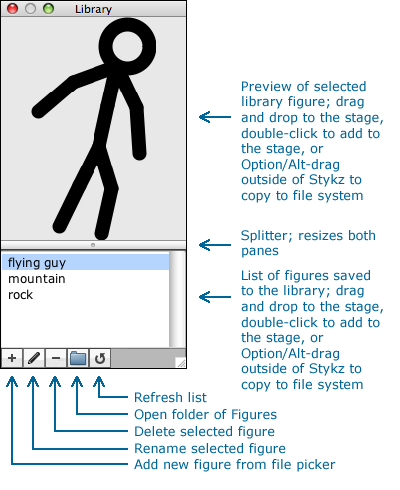
Figure Files (.styk) and the Library Folder
Figures are stored in files with a .styk extension in the Figures folder inside the Library folder in the Preferences folder on your hard drive. Any file with a .styk extension is listed in the Library palette, so that if you were to add .styk files into the Figures folder manually, the next time you launched Stykz you'd see those .styk figures listed in the Library. You can switch to the desktop and open the Library folder by clicking the folder icon in the toolbar at the bottom of the window:
Then you can open the Figures folder and all of the .styk files in your library will be listed there.
Adding a Figure to the Library
To take a figure that's on the current frame of an open Stykz document and add it to the Library, you can either right-click with the Select or Subselect tool on a segment of the figure and choose Add to Library... from the dropdown menu it displays, or you can make sure a figure is selected and choose Figure > Add to Library... from the main menubar:
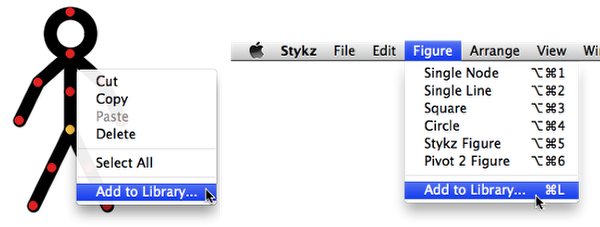
In either case you're asked to provide a name for the figure you're adding, and then the .styk file is automatically created in your Figures folder and the name you provided is added to the list of figures in the Library Palette.
Using a Figure From the LIbrary
A set of stored figures wouldn't be very useful unless you could actually use them, right? There are four ways you can take a figure that's in the Library and add it to your currently open Stykz document:

(1) You can double-click the name of the figure in the list of the Library Palette and the figure you double-clicked will appear in the center of the Stage on the currently displayed frame.
(2) You can mouse down on the name of the figure in the list of the Library Palette, and drag from the list onto the Stage; wherever you release is where the figure will be created.
(3) You can do the same as #2, but by clicking and dragging the preview image at the top of the Library Palette onto the Stage.
(4) You can right-click on the figure in the list of the Library Palette and choose Add to Stage from the dropdown menu it displays. this acts like #1 above, and places the figure center Stage.
Importing/Exporting Figures To/From the Library
You can share .styk figure files with others by importing .styk files that others have given you, or by exporting .styk files from your Library and giving them to others. For more information, see Importing a .styk File To the Library and Exporting a .styk File From the Library.
Maintaining the Library
In addition to adding figures to the Library, using figures from the Library, and importing/exporting figures for sharing purposes, you also have these capabilities:
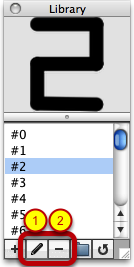
(1) You can rename a selected Library item by clicking the Rename Library Item button (the button with the pencil icon), or you can right-click on the item and choose Rename Item... from the dropdown menu.
(2) You can remove a selected LIbrary item by clicking the Delete Library Item button (the button with the "-" symbol), or you can right-click on the item and choose Delete Item... from the dropdown menu.
IMPORTANT: Although there is a confirmation dialog box that's displayed when you attempt to delete a Library item, the action cannot be undone, so once you confirm deletion the figure is permanently deleted from the Figures folder.